Si4732を使うエアバンド受信機を設計デバッグしています。Arduinoはデバッグボードではpro miniでしたが、最終形は基板をアルミケースに入れたいので、ATmega328Pを使う予定です。今回チップをECで買い、ブートローダー書き込みしました。
I'm using ATmega328P with Arduino loader the latest RF generator boards to be compact for installing in the case. So I shall make such chips from the bare ATmega328P.
書込みのやり方ですが、ググって出てきた情報でブレッドボードを使って安易にやってみたが、失敗。どうもブレッドボード、ジャンパ線配線では不安定みたいで、環境整備しないといけないと思いました。じっくり腰を入れて探したら、次のWEB内容はまとまりよく、整理されていてわかりやすかったです。参考になりました。感謝します。
I ever referred some kinds of Internet sources and failed some time with the bread board connection. This time I confirmed the writing system according with the below information. Many thanks for providing cool ideas to be put in order.
Arduino ブートローダーを書き込む (AVR)
ht-deko.com
今後また書き込みが必要となった時のため、基板接続、IDE設定をまとめました。記事内容から接続や操作の勘所をメモにしました。接続を間違いないようICSPケーブルを作りました。書き込み機はUNO,被書込み用にはICソケットが付いたUNOコンパチ基板が必要です。秋月電子の150円基板を使いました。必要最小限部品としてはICソケット、16MHz水晶とコンデンサ、ICSPコネクタ、RESET停止用22μF電解コンが必要です。
I'm using UNO for writer, UNO compatible board for written, 22uF, and ICSP cable. The UNO compatible board is composed with IC socket for ATmega328P, 16MHz Xtal, and 22p capacitors.

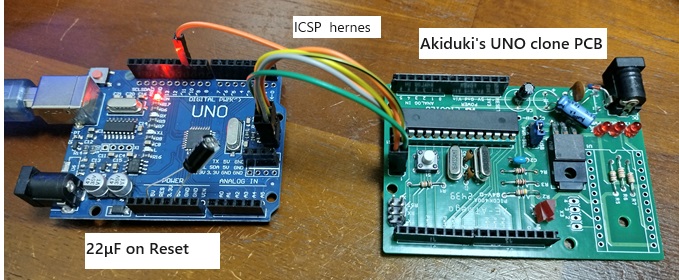
実際の基板接続